By Carissa Tomer RDMS, RVT
The eFAST (Extended Focused Assessment with Sonography in Trauma) protocol is a rapid, ultrasound assessment designed to identify potential causes of shock in trauma patients.
In this post, we will focus on the abdominal windows. You will learn how to identify intra-abdominal free fluid, along with practical scanning tips, imaging pearls, and techniques to improve your image acquisition.
This article is Part 3 of a 3-part series on the eFAST scan. The full protocol includes:
• Lung windows – assessing for pneumothorax
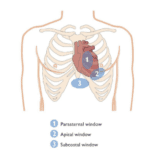
• Cardiac windows – assessing for cardiac tamponade
• Abdominal windows – assessing for intra-abdominal free fluid or bleeding
Be sure to explore the related posts in this series for a complete understanding of the full protocol.
During the abdominal component of the eFAST examination, the objective is to detect anechoic (free) fluid within the peritoneal cavity, which in the context of trauma is presumed to represent hemoperitoneum unless an alternative explanation is established. Free fluid accumulates in dependent spaces initially, making certain anatomical recesses more sensitive locations to evaluate.
For this reason, the eFAST exam focuses on three primary abdominal windows:
• Right Upper Quadrant (RUQ)
• Left Upper Quadrant (LUQ)
• Pelvis
A systematic evaluation of these areas improves detection of even small fluid collections and supports rapid clinical decision-making in trauma care.
It is important to recognize that blood typically appears anechoic (black) on ultrasound. However, in the presence of significant hemorrhage, the fluid may appear hypoechoic or demonstrate mixed echogenicity. Developing the ability to identify these variations requires exposure to a wide range of positive case studies, allowing clinicians to build the pattern recognition necessary to accurately detect different appearances of blood on ultrasound.
Right Upper Quadrant (RUQ)
Using a curvilinear or phased array transducer, position the probe in the mid-axillary line between the 8th and 11th ribs, with the indicator marker directed toward the patient’s head (cephalad). The goal is to visualize Morrison’s pouch (the potential space between the liver and the right kidney) where free fluid commonly accumulates.
Sonographic Anatomy

Figure 1. The blue line highlights Morrison’s pouch, the potential space between the liver and right kidney, where free fluid may accumulate.
*Did you know RUQ is the most sensitive site for detecting free fluid, even in patients with left-sided injury?
Pro Tips
After obtaining the initial RUQ view of Morrison’s pouch, slide the probe to include the inferior tip of the liver and the lower pole of the right kidney. Free fluid often collects first at the liver tip and, as volume increases, extends superiorly into Morrison’s pouch.
Because of this, small amounts of fluid can be missed if the scan remains too superior. Be sure to carefully sweep through the entire region, paying close attention to subtle fluid tracking along the liver edge.
Figure 2. Cine loop showing the probe sliding inferior to the tip of the right lobe of the liver, followed by a sweep through the region to evaluate early free fluid.
Diaphragm Assessment
Another critical landmark in the RUQ view is the diaphragm.
Understanding the location of fluid relative to the diaphragm helps determine its origin:
- Fluid above the diaphragm = free fluid in the chest/thoracic cavity
- Fluid below the diaphragm = intra-abdominal free fluid
Recognizing this distinction prevents misinterpretation and helps identify associated thoracic injuries.

Figure 3. Probe positioned superior to the right kidney demonstrating the liver–diaphragm interface, with the diaphragm represented by the blue line.
Fun Fact
In the absence of fluid in the thoracic cavity, you will often see a mirror image artifact above the diaphragm that appears as a duplicated liver. The diaphragm, being a highly reflective structure due to the large acoustic impedance mismatch between soft tissue and air, forms a strong acoustic interface that limits deeper ultrasound transmission causing ultrasound waves to bounce back and forth between the diaphragm and the liver. The system interprets these delayed returning echoes as deeper structures, creating the illusion of liver tissue above the diaphragm.
Left Upper Quadrant (LUQ)
Place the probe along the posterior axillary line between the ribs with the indicator marker directed toward the patient’s head.
The LUQ window can be more technically challenging than the RUQ due to gastric and bowel air, which frequently interferes with imaging.
Pro Tips
To improve your LUQ window, scan as posteriorly (dorsal) as possible. Many clinicians find it helpful to rest their knuckles against the bed top surface while holding the probe, which keeps the probe posterior enough to avoid interference from bowel gas.
Your goal is to clearly visualize the interface between the spleen and diaphragm.
This is where free fluid most commonly accumulates in the LUQ.
Sonographic Anatomy
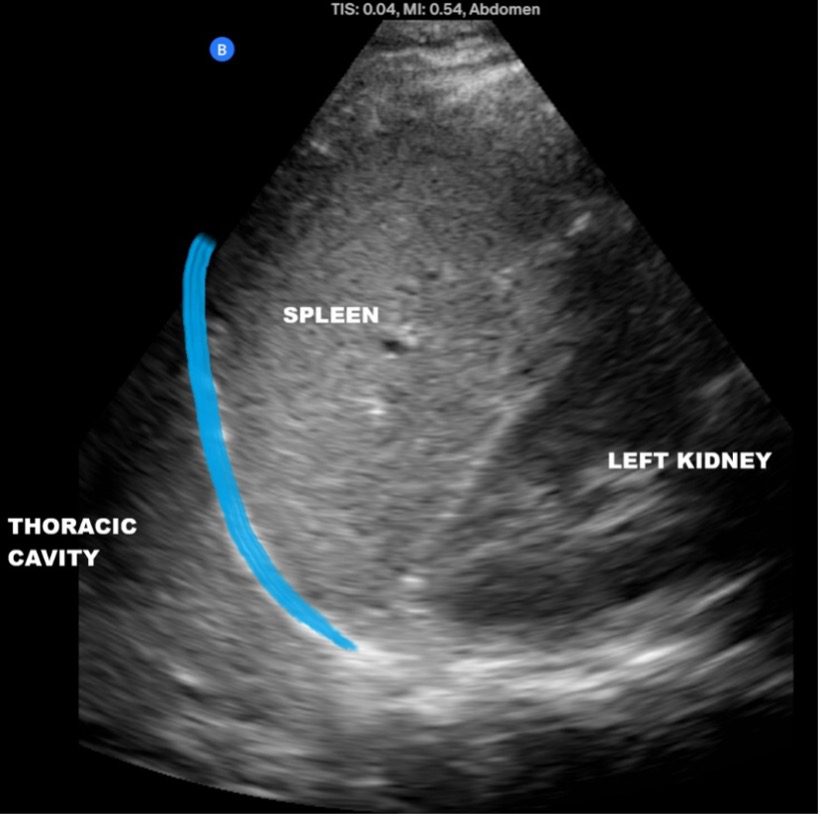
Figure 4. Image demonstrating the spleen–diaphragm interface. The blue line indicated the left hemidiaphragm. The potential space to evaluate for free fluid in the LUQ is located just inferior to it.
A common mistake is focusing only on the splenorenal interface (between the spleen and kidney). While fluid can collect here, the spleen-diaphragm interface is often the earliest and most sensitive site for detecting fluid in this window.
Pelvic Window
With the probe indicator directed toward the patient’s head, place the transducer right at the symphysis pubis to obtain a sagittal view of the pelvis.
The bladder serves as a key acoustic window and landmark, enhancing visualization of surrounding structures and improving detection of free fluid.
Sonographic Anatomy

Figure 5. In this female patient, the blue line between the bladder and uterus represents the anterior cul-de-sac (vesicouterine pouch), a potential space where fluid may accumulate. The blue line posterior to the uterus highlights the pouch of Douglas (posterior cul-de-sac), another common site for free fluid collection.
Pro Tips
One of the most common mistakes when scanning the pelvis is not placing the probe low enough.
For accurate visualization:
- Ensure the probe is directly against the symphysis pubis
- Fan the probe from the patients right to left slowly evaluating for any potential free fluid
Not seeing the bladder but confident you’re in the correct location? The bladder may simply be empty, making the pelvic window more challenging since the primary landmark is not clearly visualized. In this situation, careful probe positioning and systematic fanning are essential when evaluating for free fluid.
Take a moment to review the cine loop below—can you identify the free fluid collection?
Figure 6. Pelvic sweep demonstrating free fluid within the pouch of Douglas.
Repeat Examinations Matter
It is important to remember that a negative eFAST exam does not completely exclude intra-abdominal injury or early bleeding. Small amount of fluid may be missed during the initial evaluation. Repeating the scan when clinically indicated, especially if the patient’s condition deteriorates, can improve detection and guide timely intervention.
Summary
The abdominal component of the eFAST exam evaluates three key windows: RUQ, LUQ, and pelvis, each targeting a dependent space where free fluid is likely to accumulate.
Remember these key scanning pearls:
- In the RUQ, scan down to the inferior tip of the liver, the most sensitive location for detecting small fluid collections.
- In the LUQ, scan posteriorly and evaluate the spleen-diaphragm interface, not just the splenorenal space.
- In the pelvic window, ensure the probe is placed low against the symphysis pubis and fan through the bladder to identify free fluid.
- Fluid above the diaphragm represents pleural effusion, while fluid below the diaphragm represents intra-abdominal free fluid.
- If the initial ultrasound examination yields negative findings but clinical suspicion for intra-abdominal injury remains high, a repeat scan should be performed, as fluid collections or other signs of injury may evolve over time. Alternatively, abdominal computed tomography (CT) should be considered when there is significant concern for solid organ injury or ongoing intra-abdominal hemorrhage.
A systematic approach, careful scanning technique, and repeated exposure to normal and pathological findings will strengthen pattern recognition and improve diagnostic accuracy.
Ready to Learn?
Ready to master POCUS, expand your skills, earn CMEs, and pursue POCUS certification? We’re here to help you enhance patient care through the power of POCUS.
We offer both online and in-person training. Our step-by-step, video-based courses provide a solid foundation, while our advanced ultrasound simulation platform lets you practice image acquisition and interpretation with thousands of real patient cases.
Our bundled programs include education, CME credits, and a POCUS certification voucher to cover your certification fees — everything you need in one package.
Access the full POCUS Learning Library for FREE!
Share a few details so we can tailor new content to your specialty and region.