By Carissa Tomer RDMS, RVT
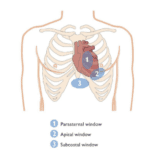
The eFAST (Extended Focused Assessment with Sonography in Trauma) protocol is a rapid, ultrasound assessment designed to identify pneumothorax, hemothorax, pericardial fluid, cardiac tamponade, and free fluid in the peritoneal cavity in a trauma patient.
In this post, we will focus on the lung windows. You’ll learn how to recognize both normal and abnormal findings, along with practical insights, imaging pearls, and tips to sharpen your scanning technique.
This article is Part 1 of a 3-part series on the eFAST exam. The full protocol includes:
- Lung windows – assessing for pneumothorax
- Cardiac windows – assessing for pericardial effusion and cardiac tamponade
- Abdominal windows – assessing for intra-abdominal free fluid/bleeding
Be sure to explore the related posts in this series for a complete understanding of the full eFAST protocol.
During the lung imaging component of the eFAST examination, the primary objective is to exclude pneumothorax. Accurate interpretation relies on recognizing the normal sonographic appearance of the pleural line and recognizing the sonographic pattern that is observed when air enters the pleural space.
Evaluation for hemothorax is also possible; however, it is generally performed during the right and left upper quadrant views by extending the scan superior to the diaphragm. This technique will be reviewed in detail in the abdominal post, Part 3 of this blog series.
Probe Selection and Patient Setup
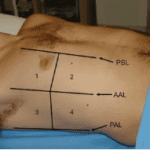
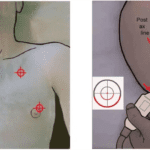
Use a high-frequency linear transducer and select the lung preset. Place the transducer along the mid-clavicular line at the 2nd intercostal space longitudinally, with the transducer indicator marker oriented toward the patient’s head. Systematically scan the anterior chest, assessing multiple intercostal spaces. In a supine patient, the anterior chest is the most sensitive site for detecting a pneumothorax, as intrapleural air rises to the least dependent area.
Note: Sonographic signs of pneumothorax are only visible when the probe is positioned directly over the air collection. This is why it is crucial to systematically scan both anterior chests and evaluate multiple intercostal spaces on each side.
What to Look for
The key structure to focus on is the pleural line. Under normal conditions, the visceral and parietal pleura slide against each other with each breath. On ultrasound, this is often referred to as a “shimmering” or “ants marching on a log” effect along the pleural line. If you use M-mode, this normal movement produces the classic “seashore sign.”
With pneumothorax, lung sliding disappears. The pleural line is fixed, with no shimmer, and M-mode will show the “barcode” or “stratosphere” sign. If you’re lucky, you may even catch the lung point, the location where normal lung sliding meets the pneumothorax, confirming the diagnosis.
It’s essential to note that other conditions can cause a lack of lung sliding; however, finding the lung point confirms a pneumothorax.

Figure 1. Normal Lung Ultrasound Anatomy
This image demonstrates normal ultrasound lung anatomy. For optimal imaging, center the pleural line on the screen and position the ribs on either side; avoid placing a rib directly in the center of the image.
Lung Sliding
Picture the pleural line as a log. Under normal conditions, you’ll see what appears to be tiny ants marching steadily along the log; that’s lung sliding. Some people refer to this as a shimmering appearance, also. When air becomes trapped between the visceral and parietal pleura, lung sliding will no longer be visible.
Figure 2. Normal Lung Sliding
This clip demonstrates normal lung sliding, reflecting intact visceral and parietal pleura.
Pro Tips
- Adjust the gray scale gain slightly lower (darker) than usual to make subtle sliding easier to see.
- If the pleural line is on a diagonal, rock the probe heel-to-toe to straighten.
- Keep your depth shallow, approximately 5 cm, to maximize the pleural line on the screen, which helps you visualize lung sliding. Depth may need to be adjusted based on the patient’s size and the thickness of the tissue layer between the skin and pleura.
Important note: Decreasing imaging depth improves image quality by focusing more pixels on the area of interest and increasing the frame rate. Simply zooming in just enlarges existing pixels, which can make the image appear grainy.
For the best image quality, adjust depth first, then zoom if needed.
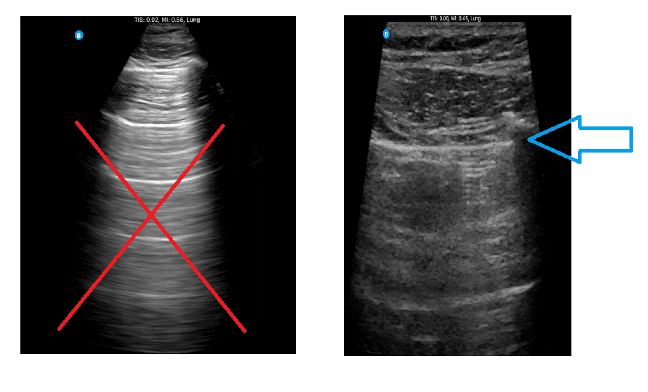
Figure 3. Optimizing Depth for Pneumothorax Evaluation
The image on the left shows a depth that is too deep for pneumothorax assessment, suitable for other lung imaging protocols, but not for this purpose. The image on the right demonstrates the ideal depth for evaluating lung sliding and the pleural line.
Clinical Pearls
Always scan both sides of the chest and check more than one intercostal space along the anterior chest. Remember, the sonographic sign of pneumothorax is only visible when the transducer is positioned directly over the air collection. This is why it is crucial to systematically scan both anterior chests and evaluate multiple intercostal spaces on each side.
Lung Point
It is important to note that the absence of lung sliding alone does not confirm a pneumothorax, as other conditions can produce this finding. The presence of a lung point, however, confirms the diagnosis and can help estimate the size of the pneumothorax. The lung point is the location where normal sliding lung meets the pneumothorax. It is characterized by a clear delineation where visible lung sliding meets an area without sliding, confirming both the presence and approximate size of the pneumothorax.
Locating it can be challenging, particularly in patients with a large pneumothorax. If the patient shows clear signs of pneumothorax and lung sliding is absent, avoid spending excessive time searching for the lung point, as it may be positioned far posteriorly and difficult to visualize.
Other Considerations
The presence of B-lines (vertical lines originating from the pleural line), comet tails (shorter vertical artifacts extending from the pleura), and a lung pulse (visible pleural movement synchronized with the cardiac cycle) are all findings that effectively exclude pneumothorax. Lung ultrasound involves interpreting artifacts seen on the screen, and these findings cannot be visualized when a pneumothorax is present, making them reliable indicators for ruling pneumothorax out.
Summary
The eFAST examination is a rapid, bedside ultrasound tool for potentially detecting life-threatening conditions such as pneumothorax, hemoperitoneum, and cardiac tamponade. When evaluating pneumothorax, systematically scan the anterior chest on both sides and multiple intercostal spaces, focusing on the pleural line and lung sliding.
Remember that the absence of lung sliding alone does not confirm pneumothorax; the presence of a lung point confirms the diagnosis and can help estimate its size. Always consider repeating the exam as clinically indicated, as small pneumothorax may be initially missed. Careful technique and a systematic approach are key to accurate and timely assessment.
Ready to learn?
Ready to master POCUS, expand your skills, earn CMEs, and pursue PCA certification? We’re here to help you enhance patient care through the power of POCUS.
We offer both online and in-person training. Our step-by-step, video-based online courses provide a solid foundation, while our simulated scanning platform lets you practice image acquisition and interpretation with thousands of real patient cases.
Our bundled programs include education, CME credits, and a PCA certification voucher to cover your certification fees — everything you need in one package.
Let’s get you started!
Visit us at UltrasoundEnergy.com
Or email us at: Clientservices@ultrasoundenergy.com