By Carissa Tomer, RDMS, RVT
Introduction
Estimating the inferior vena cava (IVC) percent collapse is a fast, non-invasive tool for assessing a patient’s volume status. It offers a real-time estimate of central venous pressure (CVP) guiding fluid resuscitation decisions. Commonly used in critical care and pre-hospital settings, IVC ultrasound helps determine if a patient will benefit from fluids or requires other interventions.
While this post focuses on measuring IVC percent collapse and interpreting the results, it’s important to note that a more comprehensive approach, known as the Venous Excess Ultrasonography Score (VExUS), should be considered when time permits. The VExUS protocol thoroughly assesses venous congestion and provides a more accurate picture of fluid status in non-emergent settings.
Additionally, performing a complete POCUS evaluation for causes of traumatic and non-traumatic shock with the eFAST or RUSH protocols will further enhance clinical decision-making. POCUS is a powerful tool; start by mastering one concept, then build upon that knowledge to expand your capabilities!
The Role of IVC Ultrasound in Fluid Assessment
POCUS is a vital tool for evaluating patients when immediate decisions are needed. In cases of shock or hypotension, quickly identifying the cause and guiding treatment can be lifesaving. IVC ultrasound plays a key role in assessing fluid status, helping clinicians determine whether a patient is fluid-responsive or requires a different intervention.
Understanding how to perform and interpret IVC ultrasound can significantly enhance patient care, particularly in emergency and resource-limited settings. However, it should always be used in the context of the patient’s overall clinical picture to guide treatment decisions effectively.
How to Perform IVC Ultrasound
1. Patient Positioning: The patient should be lying supine.
2. Probe Selection: Use a curvilinear or phased-array ultrasound probe.
3. Scan Orientation: In the sagittal scan plane, with the probe marker towards the patient’s head, place the ultrasound probe below the xiphoid process to locate and obtain a long-axis view of the IVC.
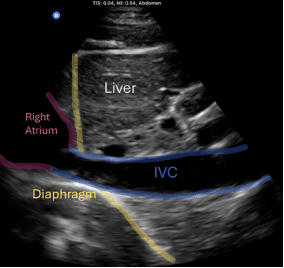
The IVC is located adjacent to the abdominal aorta. To help differentiate between the two, consider the following:
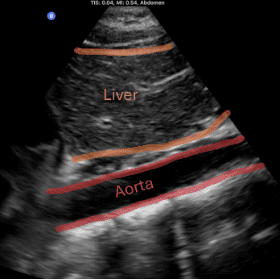
Aorta: The aorta is pulsatile with thick walls. If you trace the vessel cephalad, you’ll observe it courses posterior to the heart. The aorta should be positioned to the patient’s left. Once you’ve identified the aorta, fan the probe to the right side to locate the IVC.
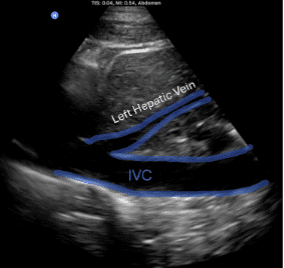
IVC: To confirm you’re visualizing the IVC, scan cephalad and you will see the IVC dumping into the right atrium. You’ll also notice the hepatic veins draining from the liver into the IVC. The IVC often has a ‘hammock-like’ appearance on ultrasound.
IVC
Aorta
4. Observation: Observe the IVC’s diameter during a few respiratory cycles.
In patients with adequate blood volume, the IVC will collapse more than 50% during inspiration. In contrast, patients with high CVP will have a plethoric, non-collapsing, or minimally collapsing IVC.
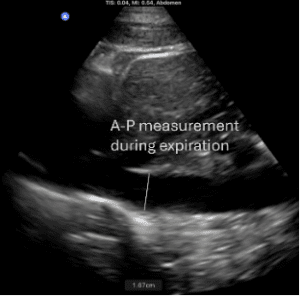
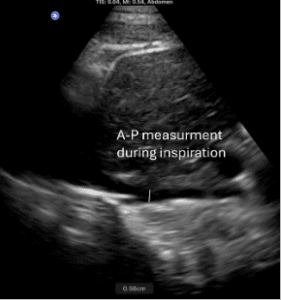
5. Measurements: Measure the anterior-to-posterior diameter of the IVC 2 cm distal to the right atrial confluence. Two measurements are needed, one with the maximum diameter during inspiration and one with the maximum diameter during expiration.
Measure the IVC using standard distance calipers on a 2D image. M-mode tracing is not recommended, as the IVC moves considerably with respiration due to its connection to the diaphragm, which can result in measurements taken at varying points along the IVC, leading to inaccurate readings.
The first step: Once the IVC is located, identify a measurement point approximately 2 cm from the right atrial junction.
The first step: Once the IVC is located, identify a measurement point approximately 2 cm from the right atrial junction.
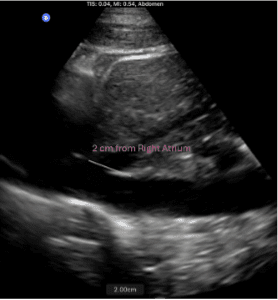
The images below show the two measurements required to calculate the percent collapse: one during inspiration and one during expiration. Both are at the same measurement point, 2 cm from the right atrial junction.
Now, let’s calculate the percent collapse:
Subtract the smallest number from the largest (in this case, 1.67 – 0.56 = 1.11), then divide that result by the largest number (1.11 ÷ 1.67 = 0.66) and multiply by 100. For the patient above, this gives a 66% collapse, or > 50%. After obtaining your measurements and calculating the percent collapse, refer to the chart below to estimate the patient’s CVP.
With practice, you can estimate the percent collapse qualitatively without measuring, achieving great accuracy!

IVC Diameter and Variability with Respiration
| IVC Diameter (cm) | Respiratory Variation | CVP (cm H2O) |
| <1.5 | Total Collapse | 0-5 |
| 1.5-2.5 | >50% | 6-10 |
| 1.5-2.5 | <50% | 11-15 |
| >2.5 | <50% | 16-20 |
| >2.5 | No change | >20 |
Interpretation:
Normal CVP (Low CVP): An IVC that collapses significantly (more than 50% collapse with inspiration) could indicate hypovolemia.
Elevated CVP (High CVP): A distended, plethoric, or non-collapsing IVC suggests an elevated CVP, which could indicate fluid overload.
Limitations and Considerations
While IVC ultrasound is a valuable tool, it has limitations that must be considered. Various factors can influence IVC responsiveness. These include increased intrathoracic or intra-abdominal pressure, cardiac function, mechanical ventilation, systemic venous congestion, and athletic conditioning.
For a more thorough fluid assessment, consider using the Venous Excess Ultrasound (VExUS) Score—a four-step protocol that includes Doppler assessments of the hepatic, portal, and renal veins, in addition to the IVC.
In critical care settings, incorporating the eFAST or RUSH protocols to evaluate for the cause of shock with POCUS alongside the IVC percent collapse will further enhance clinical decision-making.
Conclusion
In emergency and critical care settings, timely and accurate fluid management is vital. IVC ultrasound provides clinicians with a fast, non-invasive tool to evaluate a patient’s fluid status and guide treatment decisions. By integrating IVC ultrasound into clinical practice, healthcare providers can improve patient outcomes in critically ill or hypotensive patients.
If you’re an EMS or emergency care provider interested in learning more about IVC ultrasound, eFAST, or RUSH protocols, we at Ultrasound Energy would love to help you expand your ultrasound skills and improve patient care. Contact us today for further education!
Ready to Learn?
If you’re ready to learn ultrasound, expand your skill set, or get certified, we at Ultrasound Energy would love to help you improve patient care through POCUS.
We offer both online and in-person training for all ultrasound applications.
Our easy-to-follow, video-based online courses provide a strong foundation, and our simulated scanning environment allows you to practice image acquisition and interpretation with access to thousands of real patient cases.
No matter which learning format suits you best, we’ve got you covered. Let’s get you started!
Visit us at UltrasoundEnergy.com to learn more about us.
You can also email us at Clientservices@ultrasoundenergy.com.
Or set up a consultation for in-person training here: Book a Consultation