By Carissa Tomer RDMS, RVT
The eFAST protocol is a non-invasive rapid, life-saving ultrasound assessment designed to identify causes potentially life-threatening conditions in trauma patients such as occult bleeding or air in the thoracic cavity, hemopericardium, cardiac tamponade and abdominal cavity.
In this post, we will focus on the cardiac windows. You’ll learn how to identify pericardial effusion, along with practical insights, imaging pearls, and tips to sharpen your scanning technique.
This article is Part 2 of a 3-part series on the eFAST scan. The full protocol includes:
- Lung windows – assessing for pneumothorax
- Cardiac windows – assessing for cardiac tamponade
- Abdominal windows – assessing for intra-abdominal free fluid/bleeding
Be sure to explore the related posts in this series for a complete understanding of the full eFAST protocol.
During the cardiac imaging component of the eFAST protocol, the primary objective is to identify or exclude pericardial effusion with concern for tamponade. Accurate interpretation relies on identifying fluid collections and observing cardiac function for physiologic signs of tamponade.
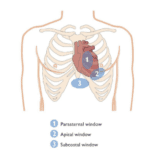
Assessment is commonly performed using the subxiphoid (SUBX) window, though the parasternal long-axis (PLAX) window can also be valuable if patient anatomy or injury limits visualization.
It is essential to understand that not all pericardial effusions result in tamponade physiology, and the size of the effusion does not reliably determine hemodynamic significance. The pericardium can slowly stretch over days to weeks to accommodate a large effusion with little effect on hemodynamics.
In contrast, a smaller effusion that develops quickly may exceed the pericardium’s capacity within minutes to hours, leading to tamponade. The rate of fluid accumulation, the ability of the pericardial sac to accommodate the fluid, and the patient’s compensatory capacity dictate symptomatology (Spodick).
For this reason, evaluation of cardiac function is equally critical. Recognizing chamber collapse, abnormal ventricular filling, and variations in cardiac motion require more than fluid detection, it requires a solid foundation in cardiac ultrasound.
While this post focuses on how to identify pericardial effusion, readers are encouraged to expand their POCUS practice to include a comprehensive assessment of cardiac function for accurate, clinically meaningful interpretation.
Subxiphoid Window (SUBX)
Probe Selection and Patient Setup
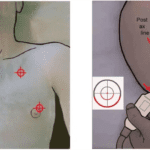
Using a phased array transducer, select the cardiac preset. For this view, position the probe below the xiphoid process and angle it upward toward the patient’s left shoulder (approximately 3 o’clock position). The indicator marker should point toward the patient’s left side. Apply steady pressure while angling the probe toward the left shoulder to bring the heart into view.
Pro Tips
This window can be challenging to obtain and often requires firm, consistent pressure. It is generally easier to hold the probe overhand, flattening the tail almost parallel to the anterior abdominal wall.
If bowel gas interferes with imaging, slightly slide the probe toward the patient’s right side and use the liver as an acoustic window. When practicing, have the patient bend their knees to relax the anterior abdominal wall muscles. You can also ask them to take a deep breath and hold it briefly—this moves the heart downward, closer to the transducer, and can improve image quality.
Sonographic Anatomy
Pericardial effusion generally presents as an anechoic (black) rim of fluid surrounding the heart. In the subxiphoid (SUBX) view, attention should be directed to the space between the right ventricle wall and the liver, where fluid may accumulate. As the effusion increases in volume, it will begin to encircle the entire heart.

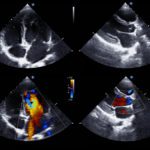
Figure 1: Subxiphoid view of the heart showing normal sonographic anatomy. The blue line highlights the space between the liver and right ventricle wall, which should be evaluated for pericardial fluid.
Parasternal Long-Axis Window (PLAX)
Probe Selection and Patient Setup
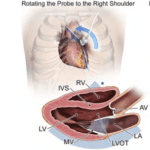
Be aware that the SUBX view may not always be easy to capture. If limited by body habitus or injury, transition to the PLAX window. Position the probe along the left sternal border high in the chest, with the transducer indicator marker oriented toward the patient’s right shoulder. Slide the transducer down the chest, keeping it close to the sternum, and watch for the heart to come into view—this is typically near the nipple line.
You may need to scan through a few intercostal spaces to identify the best cardiac window. Image quality can be further improved by having the patient roll to the left side, which brings the heart closer to the chest wall, resulting in a better image of the heart.
Pro Tips
If the left ventricle looks like it’s running uphill, the probe is positioned too distal and lateral. Slide the probe closer to the sternum and possibly up a rib space.
Make sure your depth setting is optimal, deep enough to see the descending aorta, but not too deep where it is hard to visualize anatomy and there is unnecessary image below the heart.
Sonographic Anatomy
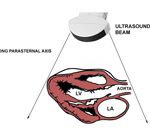
Identification of the descending aorta is critical in this view; if you see fluid, its position relative to the descending aorta determines what you’re looking at:
- Pericardial fluid collects anterior to the descending aorta.
- Pleural fluid collects posterior to the descending aorta.
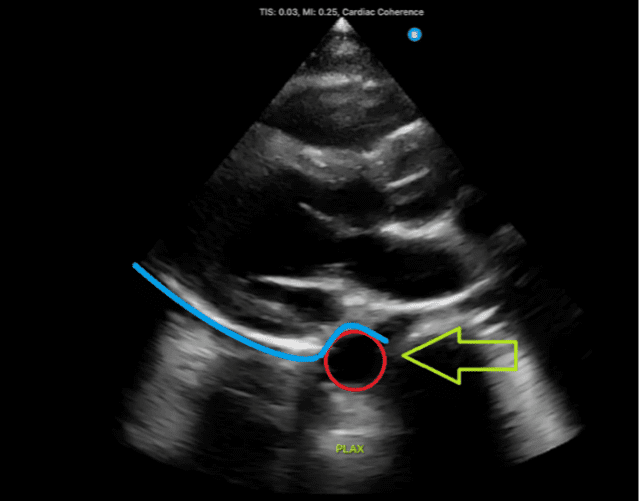
Figure 2: Normal parasternal long-axis view demonstrating the descending aorta, indicated by the red circle and green arrow. A fluid collection located above the aorta, denoted by the blue line, would suggest the presence of a pericardial effusion.
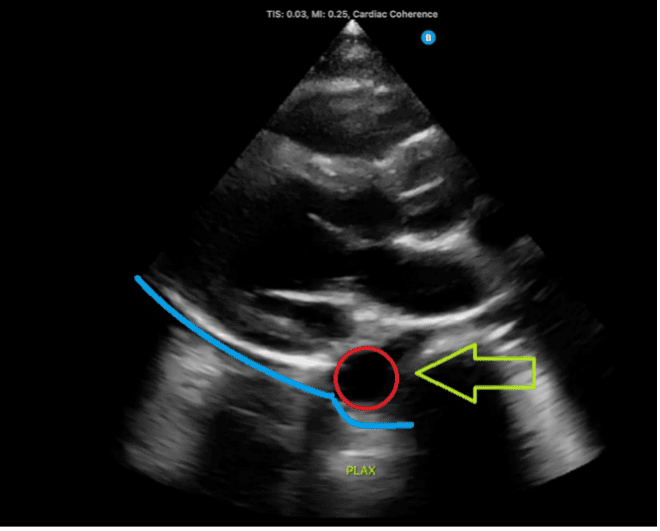
Figure 3: Normal parasternal long-axis view demonstrating the descending aorta, indicated by the red circle and green arrow. A fluid collection located below the descending aorta, denoted by the blue line, would suggest a pleural effusion.
Common Pitfalls
There are a few pitfalls that novice operators should be aware of. Misinterpretation can lead to false positives or delayed recognition of life-threatening pathology. Spending time reviewing case studies and building a robust mental image bank is essential for developing pattern recognition and diagnostic accuracy.
Epicardial Fat
Epicardial fat is a normal finding in many adults and can be mistaken for pericardial fluid. Unlike an effusion, epicardial fat remains closely adherent to the myocardium and moves with cardiac motion. Effusions, in contrast, are typically anechoic and are separate the pericardium from the myocardium. Awareness of this distinction, along with repeated exposure to both normal and abnormal cases, helps reduce diagnostic error.
Pericardial Clot
Hemopericardium initially appears anechoic, but once the blood clots it takes on a very different appearance. Clotted blood is often isoechoic, meaning its echogenicity is like surrounding soft tissue, making it far less obvious than anechoic free fluid. Recognizing clot requires careful scanning technique and familiarity with its sonographic appearance across numerous case examples.
False Negatives
Always consider repeating the eFAST exam when clinically indicated, as small pericardial effusions may be missed initially or develop over time. Timely re-evaluation with POCUS ensures early detection and appropriate management, ultimately improving patient outcomes.
Summary
The eFAST exam is a rapid bedside ultrasound tool for detecting life-threatening conditions such as pneumothorax, hemoperitoneum, and cardiac tamponade. When evaluating for pericardial effusion, remember both the SUBX and PLAX windows. In the PLAX view, carefully determine whether a fluid collection lies anterior or posterior to the descending aorta—fluid posterior to the aorta represents a pleural effusion, not a pericardial effusion.
Be aware that epicardial fat can mimic an effusion, and that hemopericardium initially appears anechoic but changes appearance once blood clots. Reviewing case studies and building a robust mental image bank is crucial for developing pattern recognition and improving diagnostic accuracy.
Employing careful technique and a systematic approach is essential for accurate and timely assessment. If the initial scan is negative, consider repeating the scan when clinically indicated or if the patient’s hemodynamic status deteriorates, as small pericardial effusions may be missed initially and develop over time.
Ready to learn?
Ready to master POCUS, expand your skills, earn CMEs, and pursue PCA certification? We’re here to help you enhance patient care through the power of POCUS.
We offer online programs, as well as virtual and in-person training. Our step-by-step, video-based online courses provide a solid foundation, while our simulated scanning platform allows you to practice image acquisition and interpretation with thousands of real patient cases.
Our bundled programs include education, CME credits, and a PCA certification voucher to cover your certification fees — everything you need in one package.
Let’s get you started!
Visit us at UltrasoundEnergy.com
Or email us at: Clientservices@ultrasoundenergy.com
References
- Spodick, D. H. (2003). Acute cardiac tamponade. New England Journal of Medicine, 349(7), 684–690. https://www.nejm.org/doi/full/10.1056/NEJMra022643
Access the full POCUS Learning Library for FREE!
Share a few details so we can tailor new content to your specialty and region.