Back to COVID-19 Main Page
Written by James Day, RDCS
When I teach medical students, I am always amazed at how much they know. They possess knowledge gleaned mostly from videos and didactic lectures. However, the expertise that remains to be amiss for point-of-care ultrasound (POCUS) beginners is image quality. I feel that knowing how to manipulate your patients’ body and using techniques that sonographers use in their labs will produce quality, on axis images.

With that in mind, I have pulled together a few basic yet vital pearls of wisdom to help make your POCUS images better — increasing your odds for accurate diagnoses.
- Holding the Transducer
Let’s start with the basics!
Grab the transducer and hold it like one would a pencil. Relax, you do not need to have a death grip on the transducer. Just like in mountain climbing, you will need to use three points of contact on the patient’s body.
- A) The transducer head is one contact point.
- B) The fleshy part of your thumb muscle/ palm is the second contact.
- C) Use your pinkie and ring finger as sort of a “balancing tripod.”
Do not be afraid to touch the patient. Ultrasound is merely an extension of the physical exam.
When you use the three-point contact, you “lock in your image” and avoid the drift and sliding that happens when you hold the transducer by the tail. You will use this grip on every image you acquire except a subcostal view.
For the subcostal, your palm will impede the 20 degrees or lower angle. You will need to image the cardiac/ liver below the rib cage properly. Take care to press BELOW the frail xiphoid process. Look under the rib cage, scan from right to left — depending on if you are interrogating the heart or liver. Your thumb and ring finger will hold the transducer, while your forefinger and middle finger leverage the pressure on TOP of the transducer for you to compress it.
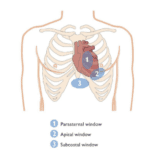
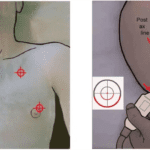
- Cardiac
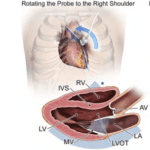
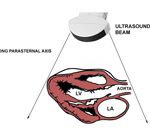
Probably the hardest images to scan and keep on axis is the cardiac system. Imagine recreating the cartoon template of a PLAX. If there are no spine injuries and you are right-handed, roll your patient on their side in the left lateral decubitus position. AKA, the “international nap position.”
In fact, roll them a little past their side, this allows the heart to “fall” closer to the chest wall. Have them extend their left hand above their head or under the pillow. This position will create a wider window in the rib cage area.
After your PLAX and SAX views, you will begin your apical views. To increase the rib window, grab the patient’s right shoulder, and pull back on it gently. Now you will hang your fingers over the transducer and feel the Point of Maximal Impulse (PMI). This is the apical point. Place your transducer on the PMI.
Ninety-nine percent of the time, you will be off axis. Move your transducer more lateral on the screen, and put the Apex of the LV right in the top of the triangle.
- Subcostals and Breathing
While compressing the transducer and “digging” in at a less than 20% angle, have your patient take a normal breath. This causes the diaphragm to push the heart closer to the transducer.
Remember, there is much attenuation as the sound beams must travel far distances. Most ultrasound machine vendors average out the various attenuation speeds in the body to 1540 m/s. By doing this, you will have to manipulate knobology (~ 10%) or body habitus (~ 90%).
To improve the image, move the body, or have the patient take a breath before you even think about extra knobology. Nine times out of 10 body habitus manipulation rather than knob manipulation will improve your images.
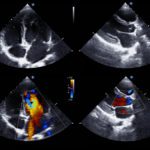
- SAX and the Lung Curtain
Many times, especially with compact body types with small rib cages, you will have to have your patient exhale. Exhaling will move the LV/RV SAX out of obscurity by the lung curtain. Remember, sound does not reflect air in the lungs. Ask your patient to exhale all their air in one steady exhalation and hold it. This move will allow you to capture several beats of the heart in the SAX view.
Quick Note: Due to the many variations in the human population, you will have long-waisted patients, compact bodies, obese, and ectomorphic body types. What this means is in the cardiac view; you will rarely get all three windows to give up great images. Often you may get the PLAX & SAX perfect, and the apicals will be technically difficult.
Conversely, you may get great apical views and technically difficult PLAX & SAX images. As you progress in your scanning, you will be able to do a complete focused cardiac scan from the subcostal view, which is particularly helpful in patients with COPD.
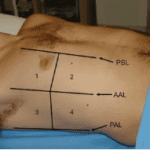
- Abdominal Pearls
Have your patients take breaths and hold it to move organs closer to your transducer head. If there are no spinal injuries, have your patients bend their knees and place their feet flat on the bed. This position allows the abdominal muscles to relax and will make it easier to compress the transducer into the abdomen. - Transverse Abdominal Aorta Scan
Beginning from the proximal aorta, you will scan down the length of the aorta in the transverse view, ending at the distal aorta. As you move along with the aorta on the screen, you will encounter bowel gas. Stop and compress, move slightly left or right to move the gas away, and gently move the intestines. Now you can visualize the aorta in the transverse view.
I hope these tips will help you create better images!
Looking for additional inspiration? Sign up for our POCUS Post™ newsletter to receive monthly tips and ideas.